While users are still debating about the usability of Windows 8, administrators are worrying about the use of Windows Server 2012, which is available either tiled or totally without a GUI on request. Underneath its new clothes, the new Windows Server variant has treasures to offer, as shown by the following tricks.
Trick 1: Efficient Use of Server Manager
Windows Server 2008 R2 in part already allowed administrators to manage the network with Server Manager. However, that was all fairly rudimentary. For example, Server Manager in Windows Server 2008 R2 could not install roles over the network, and the management of server roles was not very efficient. Windows Server 2012 is vastly improved. For example, in Windows Server 2012, you can install server roles and features over the network on other servers (Figure 1).
Figure 1: Server Manager in Windows Server 2012 provides centralized management of roles and features.
Microsoft has combined the wizards for installing server roles and features into a single wizard. This approach makes the process easier and faster because only a single install is necessary. Server Manager automatically groups installed server roles together with the appropriate servers. Server Manager lists management tools directly in the Tools menu, and you can even edit the Tools menu. To do this, open the Control Panel and look for System and Security | Administrative Tools. Server Manager shows all of the links in this area in the Tools menu. At this point, you can add more links, remove links, and even create a folder structure.
To use Server Manager in Windows Server 2012 to connect to more servers, just click on Manage and then Add Servers. In the window, you can then search for servers, so you can manage them in your local Server Manager. In this way, you also create your own groups of servers, which you can combine in Server Manager. You can then view event messages for these groups. Note that you can only install server roles and features if you have previously connected to the appropriate server.
Trick 2: NIC Teaming
Windows Server 2012 can combine up to 32 compatible network cards in teams without additional tools. During setup, you can select whether you want to use the individual adapters in the team as standby adapters to improve availability, or whether you want to combine the speed of the adapters to increase performance. You can only combine Ethernet connections in teams. Bluetooth and WLAN are not supported. Additionally, all network cards must be connected with the same speed.
To create a NIC team, launch Server Manager and click Local Server. By default, NIC Teaming is disabled. To enable the feature, click on the Disabled link. A new window will appear. Here, in the lower right area you can see which network adapters in the server are compatible with NIC teaming. To create a team, just right-click in the Adapters and Interfaces window and select Add to New Team.
The Properties link lets you define additional settings for your NIC team. Windows Server 2012 uses the MAC address of the primary NIC as the MAC address of the team. Core servers also support NIC teams. You can handle the setup either with Server Manager on another server, or you can use PowerShell. In PowerShell, you can use Get-NetAdapter to view the individual team adapter candidates and use Enable-NetAdapter or Disable-NetAdapter to enable or disable individual adapters.
All commandlets for managing NIC teams can be listed using Get-Command -Module NetLbfo. To create a new team, use the New-NetLbfoTeam commandlet. A list of comma-separated NICs is required here. Windows Server 2012 removes the IP binding from the physical network interface cards and binds them to the new virtual adapter which the wizard created for the team. You can view the status of the team in the Server Manager Local Server section by clicking on the Enabled link by NIC Teaming (Figure 2).
Figure 2: Viewing the NIC Teaming status.
If the team and the associated adapters are shown as active, you can adjust the network settings for the team. To do this, open the adapter settings by entering ncpa.cpl on the welcome page. You can then see the new team. On Hyper-V hosts you can create multiple virtual switches on the basis of the various physical adapters and then create NIC teams within virtual servers. They use the individual virtual switches of the Hyper-V host as their basis.
Trick 3: Virtual Domain Controller – Cloning and Snapshots
In Windows Server 2012, Microsoft has optimized the use of virtual domain controllers.
In contrast to previous versions, snapshots and cloned domain controllers no longer pose a risk to the entire Active Directory. To virtualize and also clone your domain controllers optimally, at least the following conditions must be met:
- The PDC emulator must be on a domain controller with Windows Server 2012. You cannot clone the PDC emulator; it must always be available during the cloning process.
- The domain must already have at least two domain controllers with Windows Server 2012 because you can only clone the second. The first one provides the PDC emulator.
- The virtualization solution must support this new technology (VM generation ID). Currently, this is only Hyper-V in Windows Server 2012.
To discover whether the virtualization solution you use supports the new VM generation ID, check out the Device Manager on a virtualized server with Windows Server 2012. The driver for system devices must be the Microsoft Hyper-V Generation Counter with the vmgencounter.sys driver file.
Before you clone a virtual domain controller, you need to run the
Get-ADDCCloningExcludedApplicationList
commandlet on the server. This cmdlet checks whether there are applications on the virtual server that do not support cloning.
If the cmdlet discovers incompatible services, for example, the DHCP service or an antivirus scanner, a message appears telling you this.
The configuration for cloning is created in the DCCloneConfig.xml file. The sample file, SampleDCCloneConfig.xml, is located in C:\Windows\System32.
After creating the DCCloneConfig.xml file, you can copy this to the folder with the Active Directory database, which is normally the C:\Windows\NTDS folder. You can only clone source domain controllers that are members of the Clonable domain controllers group in Active Directory. You also can only clone domain controllers that are not switched on. That is, you must shut down the appropriate domain controller before you can clone it.
Before adding the new domain controller to Active Directory, you must copy the DCCloneConfig.xml file customized by the cloning process from the source computer to the folder with the Active Directory database – that is, normally from the source computer to C:\Windows\NTDS on the target computer. Windows modifies the name of the file to show that a cloning process has taken place. Change the name back to DCCloneConfig.xml.
Next, you can either create a new virtual machine and use the copied hard drive, or you can import the exported server with the Hyper-V Manager or PowerShell. When you import, select the option Copy the virtual machine. When you start the domain controller, it parses the DCCloneConfig.xml file and prepares itself for the cloning. You will also receive a corresponding message when Windows starts up (Figure 3).
Figure 3: Windows Server 2012 cloning Active Directory on the new virtual domain controller.
Trick 4: Modifying the Server Name, Server Manager View, and IE
Many of the tasks that are part of the basic server configuration can be handled directly in Server Manager. To do this, click on Local Server. In the middle panel you will see the different tasks and can launch the corresponding wizards by clicking on the links.
In the View menu, you can disable the Welcome Tile; then, in Manage | Server Manager Properties enable the option Do not start Server Manager automatically at logon. Normally you need Internet Explorer to install drivers. In Windows Server 2012, advanced security is automatically enabled for Internet Explorer, which can interfere with downloading the drivers. You can disable advanced security for Internet Explorer in Server Manager as follows: Open Server Manager and on the left side, click Local Server. On the right side, click the On link next to IE Enhanced Security Configuration in the Properties section. In the dialog box that then appears, disable the option for Users or Administrators only.
After advanced security is disabled, you should be able to download drivers with no trouble.
Trick 5: Managing Windows Server 2012 with Windows 8
Microsoft provides the Remote Server Administration Tools (RSAT) to let administrators manage Windows Server 2012 with Windows 8. Installing the tools on a workstation with Windows 8 gives you all of the administration tools you need for managing Windows Server 2012.
In addition to the various management tools for the server roles, the RSAT installation wizard also adds the new Server Manager from Windows Server 2012 to Windows 8. Using Server Manager, you can connect the various servers on which Windows Server 2012 is installed to the network. You also can use Server Manager on a Windows 8 workstation to install server roles on servers.
The Remote Server Administration Tools for Windows 8 include Server Manager, management tools for server roles and features of Windows Server 2012, PowerShell cmdlets, and command-line tools for the management of roles and features. The Remote Server Administration Tools can be downloaded as a .msu file directly in the Download Center. To use Server Manager in Windows Server 2012 and Windows 8 to connect to more servers, click on Manage and then Add Server. In the window, you can then search for servers and manage them in your local Server Manager.
Trick 6: Core Servers, Minimal Server Interface, GUI
Every installation of Windows Server 2012 has a Server Core as its basis. This provides all the essential command-line management tools, but it lacks all of the graphical management tools. You need to manage the server via some other server or with the Remote Server Administration Tools on Windows 8. During the installation, you can also opt to install Server Core mode. After the installation, you can easily install the management tools and the graphical interface on Windows Server 2012.
New in Windows Server 2012, besides the ability to install the graphical management tools on Server Cores, is the Minimal Server Interface. This installs the most important management tools for the graphical interface but is missing additional applications, such as Media Player, Explorer, and Internet Explorer. The desktop is also missing with this option. Many of the programs from the Control Panel and most of the administration tools for server roles and features, do work. The Minimal Server Interface is an intermediate stage between Server Core and servers with a graphical interface.
You can uninstall the graphical interface either in Server Manager or PowerShell. In Server Manager, use Manage | Remove Roles and Features. The Remove features page has a User Interfaces and Infrastructure field with three options:
- Graphical Management Tools and Infrastructure – This refers to the management consoles of the most important graphical tools on the server. If only this feature is installed, and not the graphical shell for server and desktop experience features, you have a server with a Minimal Server Interface.
- Desktop Experience – This feature is especially intended for Remote Desktop Servers. It converts the server interface into a Windows 8 interface and provides tools such as Media Player, Photo Manager, themes, and more.
- Server Graphical Shell – You can disable this feature together with the desktop experience to use the Minimal Server Interface. Note that this also removes Explorer (formerly Windows Explorer) and Internet Explorer from the server. You can also use this feature in PowerShell with the command:
Uninstall-WindowsFeature Server-Gui-Shell
When you install a Core Server, the server is also missing the binaries for installing the graphical interface. You will need either to configure an Internet connection for the server for the installation so that you can download the required data from Windows Update, or you need to enter the folder with the Windows Server 2012 installation files.
You can perform the install on Server Cores with PowerShell using the command
Install-WindowsFeature Server-Gui-Mgmt-Infra
or you can connect with the server using Server Manager on a server on the network. Use the following commands in PowerShell:
Import-Module Dism
Enable-WindowsOptionalFeature -online -Featurename ServerCore-FullServer,Server-Gui-Shell,Server-Gui-Mgmt
Alternatively, you can do:
Dism /online /enable-feature /featurename:ServerCore-FullServer /featurename:Server-Gui-Shell /featurename:Server-Gui-Mgmt
to install the graphical interface.
Trick 7: Backing Up Virtual Servers
Veeam, the well-known vendor of virtual server backup tools, offers a free tool that lets you parse the backup of virtual Exchange Servers and restore individual objects (single-item recovery). Normal servers can also be backed up and restored in the same way.
The basis for this tool is the Veeam Backup Free Edition product. The backup software lets you back up virtual servers without any downtime – and not just virtual Exchange servers. The software also supports VMware and Microsoft Hyper-V. With Veeam Backup Free Edition, you can even connect to System Center Virtual Machine Manager 2008 R2/2012 and integrate Hyper-V clusters. If you connect a SCVMM server to Veeam backup, the software can automatically scan all the attached servers and back up the virtual servers stored on them (Figure 4). The software not only backs up individual virtualization hosts but specializes in backing up the virtual servers.
Figure 4: Free backups for virtual servers with Veeam Backup Free Edition.
Trick 8: Testing Replication in PowerShell
You can discover the status of Active Directory replication in PowerShell with the commandlet
Get-ADReplicationUpToDatenessVectorTable
or a list of all servers with:
Get-ADReplicationUpToDatenessVectorTable* | sort Partner,Server | ft Partner,Server,UsnFilter
To view the individual sites and the domain controllers at these sites, use these two commandlets:
Get-ADReplicationSite XE "Get-ADReplicationSite" -Filter * | ft NameGet-ADDomainController -Filter * | ft Hostname,Site
To view the replication connections in the PowerShell, use the command get-adreplicationconnection. Other interesting commandlets include:
Get-ADReplicationPartnerMetadata XE "Get-ADReplicationPartnerMetadata"
Get-ADReplicationFailure XE "Get-ADReplicationFailure"Get-ADReplicationQueueOperation
You can also view detailed information on the individual sites with
Get-ADReplicationSite -Filter *
in PowerShell.
Trick 9: Using Hyper-V Replication
Hyper-V replicas in Windows Server 2012 and Hyper-V Server 2012 let you replicate and synchronize virtual hard disks and complete virtual servers asynchronously between various Hyper-V hosts on the network. A cluster is not required. You can perform the replications manually, automatically, or on the basis of a schedule. If a Hyper-V host fails, the replicated servers can be switched online.
To make a Hyper-V host available for replicas, you will first need to enable and configure this option on the appropriate server in the Hyper-V Settings | Replication Configuration feature. Here, you define the data traffic and the servers from which the current server accepts replicas. Thus, you need to enable this feature first on all Hyper-V hosts.
If you are using Hyper-V Server 2012, you can also manage this server using the Hyper-V Manager on a different server and create the same settings in this way. There are no differences from the commercial editions of Windows Server 2012. Make sure you enable the Hyper-V Replica rule in the advanced firewall configuration (wf.msc) named Hyper-V Replica HTTP Listener. There is also a listener for HTTPS.
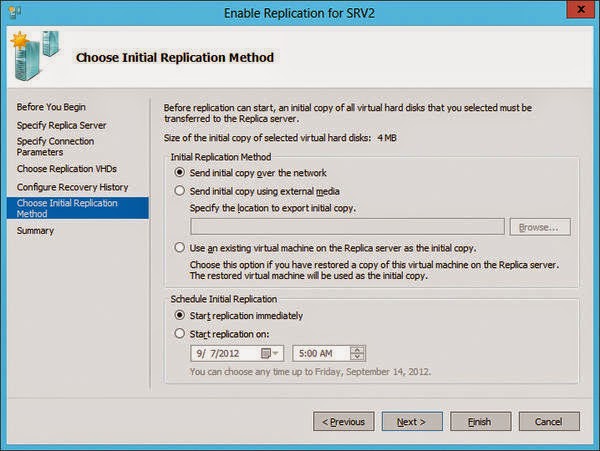
If you want to replicate a virtual server on another Hyper-V host with Windows Server 2012 or Hyper-V Server 2012, then after configuring the host, right-click on the appropriate virtual server and select Enable Replication (Figure 5).

This step launches a wizard, in which you specify how to replicate the selected server from the source host to the target server. The virtual server on the source server will remain the same.
In the wizard, you also set the target server and the authentication type. What authentication the destination server accepts is defined on the target server in the Hyper-V settings (Replication Configuration). You can also use the wizard to define which virtual hard drives you want to replicate. For the replication to work, you must enable the rules for the HTTP or HTTPS listener (depending on the traffic type you want to use) on the target server in the advanced settings of Windows Firewall (wf.msc). The rules are already there, just not enabled.
Trick 10: Failover with Hyper-V Replicas
The advantage of Hyper-V replicas is that you can perform a failover in the event of a server failure. To do so, click on the corresponding virtual server that you have replicated in Hyper-V Manager and select Replication | Failover in the pop-up menu. You can also launch a scheduled failover. In this case, you start the failover from the server on which you operate the source VM.
Next, select the restore point at which you want to fail over and then launch the failover. This only works if the source VM is switched off. During the failover, the wizard will start the replicated server, which then becomes available via the network, just like the source VM.
The advantage of a planned failover of the source Hyper-V host is that Hyper-V can send changes that have not yet been replicated to the target server so that it has the latest version. After completing a planned failover, the old source VM then becomes the new target VM, and the old target VM becomes the new source VM for replication. This means that you can also reverse this process.
Trick 11: Configuring DHCP for Failover
DHCP failover in Windows Server 2012 allows the deployment of a fail-safe DHCP server structure without a cluster. DHCP failover supports two servers with IPv4 configurations. The servers can also be members of a workgroup; domain membership is not strictly necessary.
The DHCP failover feature lets you provide two DHCP server IP addresses and option configurations on the same subnet or in the same range. This information is replicated between the two DHCP servers. Configuring the failover to load-balancing, in which client requests are distributed to the two servers, is also possible.
Open the DHCP console on the DHCP server, right-click the DHCP realm in which you want the fail-safe, and then click Configure Failover. On the second page, enter the Partner Server and then click Next. You can also specify a common secret key for this failover relationship. You can also select the mode with which you want to use the fail-safe: either load balancing or hot standby. By default, Load Balance is selected. This means that two servers share the requests. After you have completed the setup, you can view the failover in the Failover tab of the IP range’s properties (Figure 6).
Trick 12: Providing iSCSI Targets via Virtual Hard Drives
Windows Server 2012 can do more than access iSCSI targets, it can also serve up virtual disks as iSCSI targets on the network. To do this, you must install the iSCSI Target Server role in Server Manager with Manage | Add Roles and Features | File and Storage Services | File and iSCSI Services.
After installing the role service, you can use Server Manager and select File and Storage Services | iSCSI to create virtual disks that can be configured as iSCSI targets on the network. With the wizard, and as anywhere in Server Manager, you can also create virtual iSCSI targets on other servers on the network. For this to work, the iSCSI Target Server role service must be installed on the corresponding server.
In the scope of this setup, you can define the size and the location of the VHD(x) file. Additionally, you can use the wizard to control which server on the network is allowed to access the iSCSI target. You can also use an iSCSI target to provide multiple virtual iSCSI disks. After creating the virtual disks, you can use the context menu to change the settings.
Source:admin-magazine.com