Wednesday, July 12, 2017

How to automatically repeat YouTube videos

YouTube does not allow you to automatically repeat your favorite videos, but there are plenty of third-party services that can assist you. The following steps will teach you how to put any YouTube on repeat.


How to put a YouTube video on repeat

First, you'll need to browse to the video you'd like to repeat. Then, you will edit the URLin the address bar, in the manner shown above below.
Note: The video you choose doesn't matter, the URL below is one we've chosen as an example to illustrate the process.
YouTube Repeat
Editing Steps
  1. Erase everything in front of youtube. In the example above, "https://www" is the part that is deleted.
  2. After youtube, type repeat to make the URL look like the one shown below, and then press Enter.
youtuberepeat.com/watch/?v=dD40VXFkusw
  1. After pressing Enter, your browser will open a page with a URL similar to the one shown here: http://www.listenonrepeat.com/watch/?v=dD40VXFkusw
  2. This page will repeat your video until it is closed.

Friday, October 9, 2015

How to Fix Crashing Apps on iPhone - iPad

Though iPhone and iPad apps are generally very stable, sometimes you’ll encounter an application that crashes at random. In iOS, a crashing app usually presents as an app that seems to quit itself immediately, returning back to the Home Screen of the device without user intent. An app crash can happen immediately upon launching the app, crash randomly in the middle of using the app, or sometimes a crash can even be triggered predictably by a particular action that is attempted within the application. Regardless of when the iOS app is crashing, we’re going to review a few solutions that nearly always work to remedy the problem and should get you on your way to a trouble-free app usage experience again.

iOS Apps Crashing? Follow These 4 Tips to Resolve the Issue


We’re listing these tips in order of ease and difficulty, for best results you’ll likely want to try them all.

1: Quit and Re-Launch the App


Sometimes the simplest solution to a resolve a crashing application in iOS is to quit the app and then relaunch it. The idea behind this is that you’ll clear the app from memory and allow for a clean launch.
  1. Double-click on the Home button to bring up the multitasking screen
  2. Locate the application you wish to quit, then swipe up on the app to quit out of it
  3. Hit the Home button to return to the Home Screen of iOS, then tap the app icon to re-open it again
This works to remedy some basic causes of application crashes, but it’s not perfect. If the app crashes again during usage, or if you’d just prefer to prevent further issues, keep following the next tips.

2: Update the App


Keeping apps updated is often vital to maintaining application stability and the reason is quite simple: developers identify bugs within their apps, fix them, and then push an update to the app. Of course many users will ignore app updates, but if you’re experiencing a problem with a particular app, don’t do that, keep the app updated (it’s good practice anyway).
  1. Open the App Store and go to the “Updates” tab
  2. Install any updates available to the application which is exhibiting crashing problems or bugs
  3. Relaunch the freshly updated app
If the application crashing was caused by a bug that has since been remedied with an app update, this will resolve the problem.

Still having issues with an app crashing? It happens! Move onward, we’re not done yet.

3: Delete the App and Re-Install


Yes, deleting will simultaneously uninstall an app, but you’re going to re-install the same app again immediately. This is usually pretty quick, though some apps which are large can take a little while to download again.
  1. Locate the problematic app on the Home Screen of iOS, then tap and hold on the icon
  2. Tap on the (X) icon when it appears, then confirm you want to delete the app
  3. Now launch the App Store and use the Search function (or visit the Purchases tab) and locate the name of the application you just deleted, then re-download it
Try opening the app again, working fine? Good, it should be.

Another perk to deleting and reinstalling apps is that it dumps app cache at the same time, which will free up some storage capacity, and those caches can sometimes be the cause of the app crashing in the first place. Some apps in particular are really bad with handling caches, a few bad oranges will bloat out cache to be absolutely enormous in size, which, when attempting to load, can lead to an instant crash from memory issues.

The delete and re-download trick has been around for a while as a remedy for a variety of app related issues, and it often still works.

And if you’ve tried all of this but you’re still having issues with apps crashing, try to force reboot the iPhone or iPad. If it’s still having issues, you’ll want to be sure you’re updated to the latest version of iOS…

4: Update iOS to the Latest Version


Updates to iOS often include bug fixes for system software, but some of those bug fixes and refinements also impact third party apps too. Additionally, some apps actually require a new version of iOS for certain features to work, or even for the application to work at all. Updating iOS to the latest version is fairly straight forward and usually without incident, and this combined with installing the latest version of an app is usually the be-all-end-all solution to a problematic app experience. Be sure to back up the iOS device before you update iOS, however.
  1. Back up the iPhone, iPad, or iPod touch to iCloud or iTunes – don’t skip this
  2. Open “Settings” > “General” > and go to “Software Update”
  3. Choose “Download & Install” and let the entire iOS updating process complete
When the iPhone, iPad, or iPod touch boots back into the latest version of iOS, and assuming you’ve already followed the steps above and have updated the app, the app that was crashing will almost certainly work without incident at this point.

Updating to a new version of iOS and a new version of the app really works. I had a friend run into this exact scenario recently with Instagram crashing, the app kept crashing repeatedly on them no matter what they did, initially when scrolling through a feed, and then crashing instantly upon launching the app – the only solution was to update iOS to the latest version, which immediately solved the problem.

Did these tricks work to resolve your app crashing problems? Do you have another fix that works for when an iPhone, iPad, or iPod touch app crashes at random or crashes at launch? Let us know in the comments what works for you!

10 Tips for Good Smartphone Photography

We've laid out ten tips for taking good photos on a smartphone, so hopefully you'll be well on your way to producing some awesome shots from a fairly limited camera platform.
1

Know Your Auto Mode

Knowing how the automatic shooting mode on your smartphone camera works can greatly help you take good photos. Take the time to learn when it uses high ISOs, when it uses long shutter speeds, and adjust how you take photos accordingly. It especially helps to know when you decide to…
Two photos taken with the Nokia Lumia 930. Adjusting the white balance manually is necessary to get a good photo
2

Override the Defaults

Smartphones can be pretty good when it comes to choosing settings, but not always. Metering can sometimes be pretty shoddy indoors and in cloudy conditions, which is where overriding some of the settings can come in handy.
If you think the white balance is off, change it. If the photo is underexposed, use the sliders found in most camera applications to boost it. If you’d prefer grain to blur, up the ISO used by the camera manually. Don’t forget about the flash either, which is sometimes necessary.
If center-weighted metering isn’t providing the right results, you might also considering switching to spot-metering, which some cameras allow you to do. Center-weighted looks at the entire image and meters according to what it sees, with a preference on the center of the frame. When shooting subjects off-center, it can be a good idea to switch to spot metering so the area around the ‘spot’ you select is exposed perfectly.
3

Use Good Posture (or Even a Tripod)

A key method for reducing blur is knowing how to hold a smartphone camera in a stable way. Holding your arms outstretched or far away from your body can make them sway more when photographing. Moving your elbows into the sides of your body can give a bit of extra stability where needed, as can physically resting the smartphone on a stable object.
If you want perfect stability, it is possible to get a tripod attachment that you can slot your smartphone into. You’ll probably look a bit silly bringing a tripod out and about to use with your phone, but I have seen and achieved myself some fantastic shots with a tripod in hand.
The Samsung Galaxy S5's HDR mode greatly improves visible detail in shadows
4

Harness HDR Mode

Dynamic range – the range of light intensities a camera can capture in the one photo while preserving detail – tends to be a weak point in smartphone cameras. In scenes with both dark and bright areas, such as a shadowed forest, it’s difficult to capture detail in the shadows and highlights at the same time. This is where HDR mode, or high dynamic range mode, comes into play.
HDR mode takes two images of different exposures near-simultaneously, and then combines them to produce one image that has higher dynamic range than the sensor can normally achieve. On most smartphones, this is something you can and should enable when the scene you’re photographing has widely varying contrast. The difference in photos can be vast, especially on Samsung smartphones where the HDR mode is particularly effective.
HDR mode shouldn’t be used all the time, though. As it has to take two photos and combine them, trying to photograph a fast-moving subject in HDR mode can lead to nasty ghosting and other unwanted effects. Using HDR mode in darker conditions can also introduce blur, simply from the combination of two images with slow shutter speeds.
5

Use the Whole Sensor

Something that really irks me about smartphone OEMs is their choice to always default to a 16:9 image capture ratio even if the sensor itself is not 16:9. You won’t have to do anything if you have a smartphone with a 16:9 sensor like the Galaxy S5 or HTC One M8, but if you don’t, switching back to standard 4:3 can be beneficial.
Shooting in 4:3 on a 4:3 sensor not only gives you access to the full resolution of the camera, but it still allows you to crop down to 16:9 after the fact with more pixels to play with. Didn’t frame the shot perfectly the first time? Well if you were shooting in 4:3 and using the whole sensor, you might be able to get a better photo out of your shot.
HDR shot taken with a Samsung Galaxy S5 and edited in Adobe Lightroom. The original can be seen here.
6

Edit

The final piece of the puzzle that often stops a photo captured with a smartphone from looking truly awesome is the post-processing stage. All the detail and necessary information has been captured, but it may not look as vibrant as you were after, or as sharp, or as beautiful.
It’s easy to fix this: chuck the photo in an editing program on your computer, like Lightroom, or even use an app on the device itself and begin playing around. After moving a few sliders and ticking a few boxes, the results might astound you and your friends.
7

Check the App Store

You don’t have to use the default camera application on your smartphone. Check the Google Play Store, App Store or Windows Phone Store on your respective device and look for a standout camera app. Look online to see what people are saying, because there are some gems out there that can add features and controls to the smartphone photography experience.
Camera Zoom FX, as silly as it may sound, is a really solid camera replacement for Android devices. If you’re using a Windows Phone and it’s made by Nokia, make sure you’re using Nokia Camera. As for iOS, Camera+ and ProCamera are some applications to consider.
8

Never Zoom

Most smartphone cameras have the ability too zoom in while taking a photo. As the overwhelming majority of smartphones don't have an optical zoom module, this zoom feature digitally zooms, simply enlarging and cropping the output from the sensor before the photo is captured. To get the best photos from your camera, never use the zoom feature.
Zooming before capturing does not allow you to reframe the image after the fact: you're essentially losing data and reducing quality with no way backwards. Yes, the image will appear to show an image in the distance closer than it would otherwise, but you can very easily take the photo without zooming first, and then crop it afterwards. Taking the photo without zooming provides flexibility and the ability to change your mind later.
Taken with the Sony Xperia Z2 and its f/2.0 lens
9

Go Macro

Smartphone cameras don’t have the best bokeh from their wide-angle lenses, meaning it’s hard to achieve DSLR-like background blur with medium range shots (unless you have some fancy tools like the Duo Camera on the HTC One M8). How do you achieve that pleasant blur? Simply get closer to the subject of your shot, utilizing the close macro range of the focus system.
Some of the best photos I’ve achieved with a smartphone have been macro-style, using the small amount of bokeh that’s achievable to my advantage. On an f/2.4 camera system, like the LG G2 or Nokia Lumia 930, don’t expect anything incredible; but if you’re blessed with an f/2.0 system like the Sony Xperia Z2 results can be surprising.
10

Light It Right

If you want to get serious about smartphone photography, it’s crucial that your photos are lit well. Small sensors typically found in phones are not very capable when lighting gets poor, so it’s always best to ensure your subject is well lit when taking a shot. If you can use your camera at ISO 100 or lower, you’ll see less grain in the resultant image, and photos will look clearer and more impressive.
One way to achieve better lighting for your smartphone photos is to get strong artificial lights, but this probably isn’t practical or worth it considering it’s not a DSLR. The flash also tends not to be so great, so you can rule that out as well. This leaves natural light as the best source, and there are a few tips to getting the best shots in the lighting you have.
Taken with the merely okay HTC One Mini camera. Placing the paperweight near a window helps improve lighting for a better photo.
Like when photographing with any camera, ideally the sun should be behind the camera’s lens, shining light onto the subject without entering the lens directly. Pointing a camera towards the sun will cause shadowing and a loss of contrast, so try not to do so unless you want the artistic effect. In cloudy conditions the sun can be diffused throughout the sky, so avoid shooting up to the sky if it’s not a sunny day.
As I mentioned earlier, it might also be worth exploring spot metering to get the exposure just right, especially when there’s strong backlighting. Ideally you wouldn’t be shooting when there’s strong backlighting as smartphone cameras typically have weak dynamic range, but sometimes it’s necessary. And sometimes you can experiment with reflective surfaces to get light in just the right positions: often a simple white piece of paper will suffice at directing light from the sun (or an artificial light) on to your subject.
Finally, as some bonus tips for you budding videographers out there, make sure that you set your smartphone to record at the maximum resolution possible. Many smartphones that record at 4K will default to 1080p, so changing the appropriate setting will lead to better quality videos. Another thing, try recording HDR or 60 frames per second video for better quality or smoother videos.
And whatever you do, never film a video vertically.

Thursday, September 3, 2015

How to install and configure Network load balancing in Windows server 2008

Understanding the concept

In simple words I must say the network load balancing(NLB) technology distributes traffic across TCP/IP network. Hence using NLB increases availability, scalability, and load-balancing performance of your applications on network. Each host runs a separate copy of the desired server applications (such as applications for Web, FTP, and Telnet servers). NLB distributes incoming client requests across the hosts in the cluster. The load weight to be handled by each host can be configured as necessary. You can also add hosts dynamically to the cluster to handle increased load. In addition, NLB can direct all traffic to a designated single host, which is called the default host. When we configure NLB between two servers we have two static IP address those servers and a commonly shared IP address assigned as cluster IP. The machines all run an algorithm that determines whose turn is next at responding to requests. They also exchange heartbeats with one another, so they all know if one server goes down then it won’t allocate any more requests to him(By default, when a host fails to send heartbeat messages within five seconds, it has failed) and you can have up to 32 machines in a cluster.

For more information refer the below links,

Configuring NLB cluster

Note :NLB does not support Dynamic Host Configuration Protocol (DHCP). NLB disables DHCP on each interface that it configures, so the IP addresses must be static. We must have another static IP address which should be assigned as cluster IP. So make sure that you have it before this process.

1. You must install the feature NLB on all servers which and all need to be take part in NLB clustering. In order to achieve that, From Server manager select Features->Add features and select Network load balancing, Click Next to continue.


2. Click on install button and close the installation results window once it succeeds.


3. To configure the cluster open NLB window. Start->Administrative tools->Network load balancing manager.
4. Now you need to create the cluster and its hosts which will handle the traffic. Right-click Network Load Balancing Clusters->Select New Cluster or Cluster->New to start.
5. In the Host text box type the name or IP address of the host that is going to be the member of your NLB(If you are adding the server which is a remote host, make sure that the feature NLB is installed on that server as well, follow the above steps to achieve this), and then click Connect.


You may fail to connect to another server if the NLB feature is not installed on another server. Select the interface you wish to use for cluster and click Next.

6. In Host Parameters, select a value in Priority which will be Unique for each host . The host with the lowest numerical priority among the current members of the cluster handles all of the cluster's network traffic that is not covered by a port rule. You can override these priorities or provide load balancing for specific ranges of ports by specifying rules on the Port rules defines on step 9.
Also you can add a dedicated IP address if required by clicking Edit button, Click Next.


7. In Cluster IP Addresses, click Add and type the cluster IP address that is shared by every host in the cluster. NLB adds this IP address to the TCP/IP stack on the selected interface of all hosts that are chosen to be part of the cluster, Click Next.


9. The next step defines the most vital part which will help you to define the traffic across the cluster nodes. If you wish to control the server loads automatically you can click on Finish which will create the cluster node now. Let us consider the scenario that either of your server is having higher hardware configuration and obviously that server will be able to handle more load, so this can be achieved by defining the port requests. Means, the request from defined ports will hit to the defined server and the rest will go to another server. Click on Edit, Now define the port range that is required redirect to this host.

In Protocols, select TCP as the specific TCP/IP protocol that a port rule should cover. Only the network traffic for the specified protocol is affected by the rule. Traffic not affected by the port rule is handled by the default host. I would prefer the request through TCP/IP and UDP to hit on the same server, hence selected as Both.

In Filtering mode, select Multiple host which specifies that multiple hosts in the cluster handle network traffic for this port rule.

In Affinity ( It is the mode that determines how the servers are going to balance the load, for morehttp://technet.microsoft.com/en-in/library/cc733056.aspx )Select Single and click OK->Finish. Wait for few seconds to complete the configuration.


10. The below screen describes the steps that will happen during the configuration of NLB.


Steps 3 to 9 has helped us to create the cluster and one of its host. In a NLB structure we will have multiple host to handle the traffic and in order to add the another host,Right click on the newly created cluster and select Add Host To Cluster. The above steps will help you as required(Except step 8 as we have already created the cluster). Once it succeeds you will have the below structure.


Tuesday, September 1, 2015

How to Uninstall Windows 10’s Built-in Apps (and How to Reinstall Them)


Windows 10 includes a variety of universal apps, and there’s no easy way to hide them from the “All Apps” view in the new Start menu. You can uninstall them, but Microsoft doesn’t allow you to easily uninstall them in the usual way.

You probably don’t want to do this. These apps take up very little space on your device so it’s best to just ignore them if you don’t want to use them. But, if you really want to uninstall them, you can. If you’ve already uninstalled included apps, you can get them all back with a single command.

Uninstall the App Normally


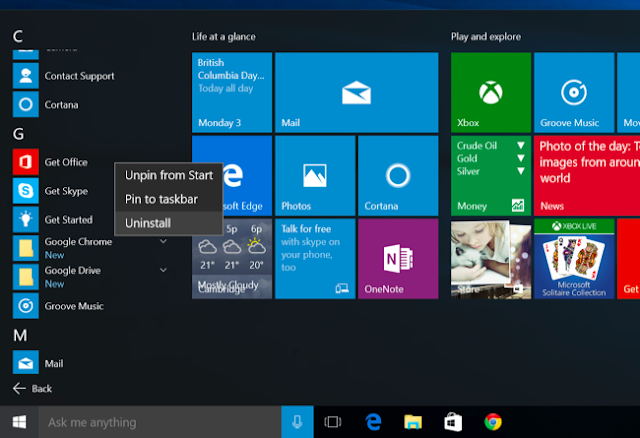
Some apps allow you to uninstall them in the normal way. Just right-click an app in the All Apps list in the Start menu and select “Uninstall”. (On a touch screen, long-press the app instead of right-clicking.)

This trick appears to work for the included Get Office, Get Skype, Get Started, Microsoft Solitaire Collection, Money, News, Phone Companion, and Sports apps. You can also uninstall bloatware apps your PC manufacturer has installed using this trick. However, Microsoft’s other included Windows 10 apps can’t be removed in this way.


Use PowerShell to Uninstall Built-in Apps


You can uninstall most of the built-in apps — even ones that don’t normally offer an “Uninstall” option — with a PowerShell cmdlet. This trick won’t allow you to remove a few of the most important built-in apps, including Cortana and Microsoft Edge. If you try, you’ll see an error message saying they can’t be removed.

First, open PowerShell as administrator. Open the Start menu, search for “PowerShell,” right-click the PowerShell shortcut, and select “Run as administrator.” Agree to the UAC prompt.


Copy and paste one or more of the following commands into the PowerShell prompt, pressing Enter after each one to remove the apps you don’t want on your Windows 10 system:

Uninstall 3D Builder:

Get-AppxPackage *3dbuilder* | Remove-AppxPackage
Uninstall Alarms and Clock:
Get-AppxPackage *windowsalarms* | Remove-AppxPackage
Uninstall Calculator:
Get-AppxPackage *windowscalculator* | Remove-AppxPackage
Uninstall Calendar and Mail:
Get-AppxPackage *windowscommunicationsapps* | Remove-AppxPackage
Uninstall Camera:
Get-AppxPackage *windowscamera* | Remove-AppxPackage
Uninstall Contact Support:
This app can’t be removed.
Uninstall Cortana:
This app can’t be removed.
Uninstall Get Office:
Get-AppxPackage *officehub* | Remove-AppxPackage
Uninstall Get Skype:
Get-AppxPackage *skypeapp* | Remove-AppxPackage
Uninstall Get Started:
Get-AppxPackage *getstarted* | Remove-AppxPackage
Uninstall Groove Music:
Get-AppxPackage *zunemusic* | Remove-AppxPackage
Uninstall Maps:
Get-AppxPackage *windowsmaps* | Remove-AppxPackage
Uninstall Microsoft Edge:
This app can’t be removed.
Uninstall Microsoft Solitaire Collection:
Get-AppxPackage *solitairecollection* | Remove-AppxPackage
Uninstall Money:
Get-AppxPackage *bingfinance* | Remove-AppxPackage
Uninstall Movies & TV:
Get-AppxPackage *zunevideo* | Remove-AppxPackage
Uninstall News:
Get-AppxPackage *bingnews* | Remove-AppxPackage
Uninstall OneNote:
Get-AppxPackage *onenote* | Remove-AppxPackage
Uninstall People:
Get-AppxPackage *people* | Remove-AppxPackage
Uninstall Phone Companion:
Get-AppxPackage *windowsphone* | Remove-AppxPackage
Uninstall Photos:
Get-AppxPackage *photos* | Remove-AppxPackage
Uninstall Store:
Get-AppxPackage *windowsstore* | Remove-AppxPackage
Uninstall Sports:
Get-AppxPackage *bingsports* | Remove-AppxPackage
Uninstall Voice Recorder:
Get-AppxPackage *soundrecorder* | Remove-AppxPackage
Uninstall Weather:
Get-AppxPackage *bingweather* | Remove-AppxPackage
Uninstall Windows Feedback:
This app can’t be removed.
Uninstall Xbox:
Get-AppxPackage *xboxapp* | Remove-AppxPackage


How to Reinstall All Built-in Apps


If you decide you want the preinstalled apps back, you can get them back with a single line of PowerShell code. Again, open a PowerShell window as Administrator. Copy and paste the following line into the PowerShell window and press Enter:

Get-AppxPackage -AllUsers| Foreach {Add-AppxPackage -DisableDevelopmentMode -Register “$($_.InstallLocation)\AppXManifest.xml”}

This tells Windows to install those default apps again. Give it some time and allow it to finish, even if nothing appears to happen at first. Even if you see an error message, restart and examine your Start menu — you may just have all those default apps back again, anyway.


Friday, August 28, 2015

How to Log Out Another User Without Logging In On Mac OS X

For Macs who have multiple user accounts on a single computer, sometimes you may log in to multiple user accounts concurrently. This leaves the prior user account logged in while another user account session opens. There’s really nothing wrong with that, aside from reducing available resources, but sometimes you may wish to log out the other user account. The typical action to log out another user account in OS X is to switch to that account, log out from the  Apple menu, and then returning to the desired account with another login. Kind of a hassle, right? Another option is to force the other user account to log out, without having to log back into it on the Mac.

Notice we said force the other account the log out, because how this actually works is to force quit the login process of the target user. Just like force quitting elsewhere, using this to forcibly log the target user out will cause any open application on their account to quit and exit without any saving or caching, which could result in unintended data loss since none of the open files, applications, or data would be saved. If you’re comfortable with that, continue to learn how to log out another user account without having to log into that user account first. If you’re not comfortable with that, just log back into that user account and log it out manually after saving files.

How to Force Log Out User Accounts on a Mac Without Logging Into Them


This will log out any target user account in Mac OS X without having to log back into it, it works the same in all versions of OS X.
  1. Launch Activity Monitor from Spotlight (Command+Spacebar) or through /Applications/Utilities/
  2. From the “View” menu choose “All Processes”
  3. Use the search box in the upper right corner of Activity Monitor to search for “loginwindow” – be sure to use exact syntax
  4. Select the ‘loginwindow’ process belonging to the user account you wish to log out

  5 . Click the (X) Quit Process button and verify that you want to quit the loginwindow process for that    
       user, acknowledging that it will log out the related user account
  6.   Enter the admin password if requested, otherwise just choose “Force Quit” and continue, exit out of 
       Activity Monitor when finished

By force quitting the target loginwindow process you are instantly logging out that target user and killing all of their applications and processes.

Because you’re targeting the user account name with this method, there is no visual cue like a profile picture to assist identification, so be sure you’re picking the proper user account to target for the forced log out procedure. As mentioned before, it will force quit all applications and processes on the target logged in user account, which could result in unintended data loss on that user account. This makes the task generally best reserved for advanced Mac users, though it’s clearly accessible to all user accounts, assuming you have an admin password to override whoever the other logged in user account is.

If you’re wondering, you can log out any user account this way by targeting it’s accompanying “loginwindow” process ID and quitting it, whether it’s any other user account on the Mac that is logged in, a guest user account, a hidden account, or even yourself. Of course if you kill the ‘loginwindow’ process of your own user account you are effectively logging yourself out in a forcible manner, which is rarely desirable.

How to Restore a Mac from a Time Machine Backup


While Macs have a great reputation for being stable and rarely experiencing major issues, the reality is that sometimes things can go wrong. Typically this happens when either a hard drive fails or an OS X system update goes completely awry, but if you have set up Time Machine backups on the Mac like all users should, then you will discover that restoring an entire systems hard drive from that Time Machine backup is really quite easy.

To be perfectly clear, restoring Mac OS X and all of your personal stuff from a previously made Time Machine backup is really only needed in extreme situations, and fortunately this is not something that is frequently required or necessary. Nonetheless, it’s good to understand how this process works, so if you ever find yourself in a situation where you have a new hard drive (or even a new Mac), or you just need to perform a complete restore of a previous backup, this tutorial will cover that restoration process of everything with Time Machine.

Note this aims to recover and restore an entire Mac, including all files, all applications, and OS X system software, everything that is made from and contained within a Time Machine backup. If you only want or need to re-install OS X, you can use Internet Recovery for that, which will replace only the system software portion, without any personal files or applications.

Restoring and Recovering an Entire Mac System from Time Machine Backups


  1. Connect the Time Machine backup drive to the Mac if you have not done so already
  2. Start up or reboot the Mac and hold down the Command+R keys simultaneously, this will boot into the OS X Recovery Partition
  3. At the “OS X Utilities” screen, choose “Restore from Time Machine Backup” and click on the Continue button

   4.   Select the Time Machine volume (either the external back up drive, network Time Capsule, or 
        otherwise)
   5.  Select the date and time of the Time Machine backup you wish to restore the entire Mac from, and 
       click on “Continue” – this begins the restoration process from the backup you selected, generally you’ll         want to pick the most recently made backup but advanced users may choose another date (keep in mind        if you pick an earlier date you will lose files and data created from that date onward)
   6. When Time Machine has finished restoring everything, the Mac will reboot into the restored state from          the chosen backup date

Pretty easy, right? You’ll be back on your feet in no time with this method of restoring a hard drive from Time Machine backups.

Of course it may go without saying that this requires a recent Time Machine backup to even restore the Mac from in the first place, which is why setting up Time Machine, letting it perform it’s backup routine on schedule, and ideally starting and completing manual backups before installing system updates or modifying major OS X components is so strongly recommended.

Do note that you can re-install OS X without a Time Machine backup, but you can lose personal files that way. Having frequent backups is basically essential, so if you haven’t done so yet, do yourself a favor and get Time Machine configured with your Mac, hopefully you’ll never need to use the backup service, but if you do, you’ll be happy you set it up.

Thursday, August 20, 2015

How to Find and Remove Duplicate/Unwanted Files in Linux Using ‘FSlint’ Tool

Very recently I have written a post on fdupes utility which is used to find and replace duplicate files in Linux. This post was very much liked by our readers. If you have not gone through the fdupes utility post, you may like to go through it here:

  • fdupes Tool to Find and Delete Duplicate Files
This post aims at throwing light on what is fslint, its features, installation and usages.


What is fslint?


fslint is a Linux utility to remove unwanted and problematic cruft in files and file names and thus keeps the computer clean. A large volume of unnecessary and unwanted files are called lint. fslint remove such unwanted lint from files and file names. Fslint help fight against unwanted files by coping with duplicate files, empty directories and improper names.

Features of fslint


  • It is a combination of different tools that look after duplicate files, empty directories and improper name.
  • Simple GTK+ Graphic front-end as well as command-line.
  • Fslint cope with lint that relates to Duplicate files, Problematic filenames, Temporary files, Bad Symlinks, Empty directories and Non-stripped binaries.
  • Help you in reclaiming disk space that were used by unnecessary and unwanted files.

Install fslint on a Linux


Installation of latest version of fslint package can be installed as easy as executing following command onDebian based systems such as Ubuntu and Linux Mint.
$ sudo apt-get install fslint 
On CentOS/RHEL based distributions, you need to active epel repository to install fslint package.
# yum install fdupes
# dnf install fdupes [On Fedora 22 onwards] 

How do I use fslint Command?

Hope you know one of the basic rule of computation and understand the risk – have backup. Before you start testing this application make sure you have backup of everything on your system, so that even if an important file gets deleted you may restore almost immediately.

Now as you know that fslint is one such application that has a command-line interface as well as a front-end GUI at the same time. You may use either.

For developers and administrators, CLI version is preferred as it gives you immense power. GUI front-end is best suited to newbies and those who prefer GUI over CLI.

fslint Command Line Usage


The command line version of fslint is not on the path of most of the Linux users. You may access it at the location /usr/share/fslint/.
$ ./usr/share/fslint/fslint/fslint 
Sample Output

-----------------------------------file name lint ./.config/google-chrome/Default/Pepper\ Data/Shockwave\ Flash/WritableRoot/#SharedObjects/NNPAG57S/videos.bhaskar.com/[[IMPORT]] ./Documents/.~lock.fslint\ -\ Remove\ duplicate\ files\ with\ fslint\ (230).odt#
 ./Documents/7\ Best\ Audio\ Player\ Plugins\ for\ WordPress\ (220).odt
./Documents/7\ Best\ WordPress\ Help\ Desk\ Plugins\ for\ Customer\ Support\ (219).odt .
./Documents/A\ Linux\ User\ using\ Windows\ (Windows\ 10)\ after\ more\ than\ 8\ years(229).odt ./Documents/Add\ PayPal\ to\ WordPress(211).odt ./Documents/Atom\ Text\ Editor\ (202).odt ./Documents/Create\ Mailchimp\ account\ and\ Integrate\ it\ with\ WordPress(227).odt ./Documents/Export\ Feedburner\ feed\ and\ Import\ it\ to\ Mailchimp\ &\ setup\ RSS\ Feed\ Newsletter\ in\ Mailchimp(228).odt ----------------------------------DUPlicate files
 Job 7, “/usr/share/fslint/fslint/fslint” has stopped 
Important: Two things you should be kept in mind at this point. First fslint don’t delete any file on its own, It just shows you the lint files, their location and their name. You have to decide what to do with them. Second is fslint by default start searching from your ‘/home’ directory.

To search a different other than your /home directory, you must pass the directory name with the command, as:
$ /usr/share/fslint/fslint/fslint /home/avi/Pictures


To search recursively to all the sub-folders, you should use flag ‘-r’, simply as:
$ /usr/share/fslint/fslint/fslint -r /home/avi/Music/


fslint GUI Usage


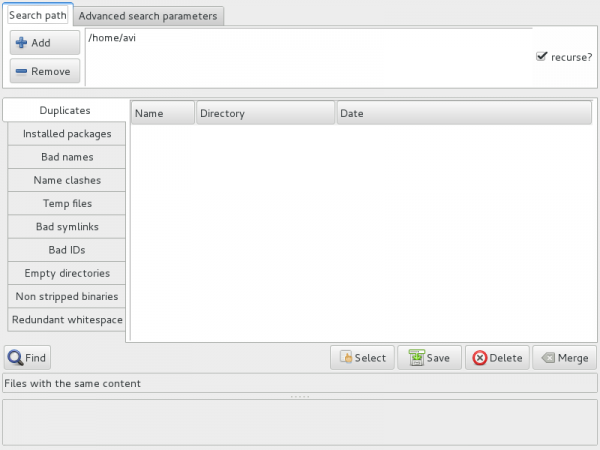
You may fire the GUI Application built on top of fslint by typing fslint from Linux terminal or from theApplication Menu.
$ fslint-gui

Everything in GUI is simple to understand. All you need to do is:
  • Add/remove the directories to scan.
  • Select to scan recursively or not by checking/unchecking checkbox on the top-right.
  • Click on ‘Find’. And all done!
Again you should remember, this utility do not delete the lint files but provide you with the information only and leaves everything on you.

Conclusion


fslint is a perfect tool that remove lint of various types from a file system. Though it needs improvement in certain gray areas: –
  • A bit slow for duplicate photo detection.
  • Requires some improvement in User Interface.
  • No Progress meter.
Hope you liked the post. If yes! Be audible. Post your valuable feedback in the comments below. Stay tuned and connected to Tecmint while I am working on another post you will love to read. Like and share us and help us get spread.

Saturday, August 15, 2015

How to Optimize Windows 10 for Battery Life


Windows 10 has brought some nice new features to our PCs, and Microsoft hasn’t forgotten the portable device users either. While not as flashy as on-the-fly switching tech Continuum, there have been a couple of useful additions to manage your battery life more effectively.

I’ve taken a keen interest in this, as I’ve been running all the Preview Builds on my laptop. It’s an aging Dell with its original battery, so as you can probably guess, it isn’t at its peak. On the bright side, the new battery management features have helped me optimize my usage just that little bit better, giving me more control over where I work.

Meanwhile, Windows 10 has also been criticized for atrocious battery life. This may be due to a bug, which Intel and Microsoft have been looking into. If you think you’re affected, be sure to update you drivers! But it could also be due to sub-par settings.

Let’s take a look at the new, and the familiar functions.

Battery Saver


Windows 10 is set to appear on over 1 billion devices and it would be fair to assume a reasonable proportion of them will be, in some manner, portable. Be that tablet, laptop, or phone, Microsoft wants to ensure you have maximum uptime when on the move and as such the engineers have given us wider scope to alter our battery settings. This is where Battery Saver comes into play.


Battery Saver allows us to control where our battery power is best spent. We can turn off power hungry background processes while allocating more power to individual applications, helping squeeze the final drops of your battery life even further.

When turned on, Battery Saver automatically:
  • Halts email and calendar updates.
  • Halts Live Tile updates.
  • Restricts background applications.
To access Battery Saver settings press Windows + I, and head to System. You’ll spot Battery Saver in the left-hand column. From here you can toggle the Battery Saver settings, including the automatic saver threshold, and which applications can continue receiving updates.


You do have to turn Battery Saver mode on to reap the benefits: it isn’t an automatic feature.

Cortana


Cortana is Windows 10’s personal digital assistant. She sits on your taskbar and can help with a number of tasks. We’ve received a few questions regarding the battery usage of Cortana on portable devices. As far as we can tell, using Cortana shouldn’t massively negatively affect your battery. Sure, you’re using a small amount of processing power each time, but the activities currently completed by Cortana cannot be considered overly taxing.

Debate continues regarding the “Hey Cortana” search feature. Cortana can be in an always-on, listening state waiting to receive voice-commands. Speculation toward the affect on battery life is as yet inconclusive, with some users reporting the Cortana process idling as high as 6% of processor power. However, my own tests have shown Cortana using <0.3% processing power while idle, jumping up only when the “Hey Cortana” command triggers an actual response.


Microsoft acknowledges Cortana will use more battery power. It literally states it in the Cortana settings, but without any specifics, or even averages of what this means for your battery life, which is slightly infuriating to those dependant on remaining mobile.


If you do have any doubts about the “Hey Cortana” effect on your battery, simply switch it off. Type Cortana into the search bar and press Enter. Switch Let Cortana respond to Hey Cortana to Off, and you’re good to go.

Windows Update


Windows 10 now silently updates in the background, you might find your battery suddenly dropping off if you’re connected to any un-metered network as updates download. If a large update rolls in, It can make for some unexpected drops in power, so it can be worth checking for updates at the start or end of your day, when you’re close to a dedicated power supply.

What’s worse, Windows can share updates you’ve downloaded with other computers in your local network or on the Internet, causing a serious drain on your battery, as well as affecting your Internet bandwidth. To off the Windows Update Deliver Optimization, head to Settings (Windows + I) > Update & security >Windows Update > Advanced options > Choose how updates are delivered, and either switch to PCs on my local network or turn the feature offentirely.


PowerCfg


PowerCfg is a hidden command tool you use to tweak power settings on your portable device. Most usefully, you can generate a list of devices with permission to wake your computer. Some programs can set “wake timers,” allowing your system to perform activities on its own timetable. Sometimes this is useful, such as Windows Update getting on with its processes when you’re sleeping. But if you’re not connected to a power-source, it can drain your battery unexpectedly, leaving you powerless for your morning commute.

The powercfg –devicequery wake_armed command will show you what’s waking you up and consuming battery. You can then track down any unwanted processesand turn them off.


You can also use powercfg /a to see the various sleep states your system can use. Those devices using Windows 8, 8.1, or 10, and with specific hardware designs can make use of the Standby (Connected) tool, but it isn’t available on every device. This tool enables your sleeping system to still notify you if a Skype call comes through, or if you receive a priority email, but amazingly uses no-more battery than regular sleep.

Perhaps most useful of all is the powercfg /energy command. This command tracks your system usage for 60 seconds and generates a power report illustrating your system energy efficiency, like so:


As you can see, my aging Dell is running into a few issues as time ticks on, but nothing too horrendous. Still life in the old boy! If you see serious errors, check them out in the extended html report. Some can be erroneous: my processor was hitting 75% utilisation during the test, enough for a serious tag, but it really isn’t a problem.

Finally, use powercfg /batteryreport to generate a up-to-date analysis of your battery, including charge ratings, number of cycles, and a recent history of battery use/charge periods. Even a cursory glance at this can help you spot battery issues; my maximum charge capacity has dropped by almost half in seven years.


Don’t Forget: Power Plans


These are old news, so we are really not going to elaborate on Power Plans in too much detail other than to say they are useful, and you should make use of them where possible. They, along with new features like Battery Saver, will help you squeeze every ounce of lithium from your battery when on the move.


You can still access Power Plans through the Control Panel, as reported previously. In Windows 10, you can also manage them inside the Settings app. Press Windows + I, head to System > Power & sleep for quickly adapting the most basic setting. Click Additional power settings to head into the Control Panel.


This is a nice new battery tile for the Start menu and the lock screen, displaying your battery life. It isn’t super flashy, but is a handy tool made using new Windows 10 API, and best of all, it’s free, so why not try it?


Note: it isn’t possible to restrict app downloads to specific operating systems, yet, so this can be used with Windows 8, but will only show battery care tips.

Windows 10 Battery Roundup


Here goes: Battery Saver is another useful addition to the Windows ecosystem, but I still trust the Power Saver Power Plan to save me in extreme power difficulties. If you don’t fancy the trek through the Settings app, you can take a shortcut to find all your familiar, tweakable settings in the Control Panel: hit the Windows button on your keyboard, type power plan, and select the first result, which is edit power plan.

Overall, Windows 10 does appear to be better for portables, a big plus for a company pushing for one billion devices sooner rather than later.