Showing posts with label Lilux OS. Show all posts

Thursday, August 20, 2015

How to Find and Remove Duplicate/Unwanted Files in Linux Using ‘FSlint’ Tool

Very recently I have written a post on fdupes utility which is used to find and replace duplicate files in Linux. This post was very much liked by our readers. If you have not gone through the fdupes utility post, you may like to go through it here:

  • fdupes Tool to Find and Delete Duplicate Files
This post aims at throwing light on what is fslint, its features, installation and usages.


What is fslint?


fslint is a Linux utility to remove unwanted and problematic cruft in files and file names and thus keeps the computer clean. A large volume of unnecessary and unwanted files are called lint. fslint remove such unwanted lint from files and file names. Fslint help fight against unwanted files by coping with duplicate files, empty directories and improper names.

Features of fslint


  • It is a combination of different tools that look after duplicate files, empty directories and improper name.
  • Simple GTK+ Graphic front-end as well as command-line.
  • Fslint cope with lint that relates to Duplicate files, Problematic filenames, Temporary files, Bad Symlinks, Empty directories and Non-stripped binaries.
  • Help you in reclaiming disk space that were used by unnecessary and unwanted files.

Install fslint on a Linux


Installation of latest version of fslint package can be installed as easy as executing following command onDebian based systems such as Ubuntu and Linux Mint.
$ sudo apt-get install fslint 
On CentOS/RHEL based distributions, you need to active epel repository to install fslint package.
# yum install fdupes
# dnf install fdupes [On Fedora 22 onwards] 

How do I use fslint Command?

Hope you know one of the basic rule of computation and understand the risk – have backup. Before you start testing this application make sure you have backup of everything on your system, so that even if an important file gets deleted you may restore almost immediately.

Now as you know that fslint is one such application that has a command-line interface as well as a front-end GUI at the same time. You may use either.

For developers and administrators, CLI version is preferred as it gives you immense power. GUI front-end is best suited to newbies and those who prefer GUI over CLI.

fslint Command Line Usage


The command line version of fslint is not on the path of most of the Linux users. You may access it at the location /usr/share/fslint/.
$ ./usr/share/fslint/fslint/fslint 
Sample Output

-----------------------------------file name lint ./.config/google-chrome/Default/Pepper\ Data/Shockwave\ Flash/WritableRoot/#SharedObjects/NNPAG57S/videos.bhaskar.com/[[IMPORT]] ./Documents/.~lock.fslint\ -\ Remove\ duplicate\ files\ with\ fslint\ (230).odt#
 ./Documents/7\ Best\ Audio\ Player\ Plugins\ for\ WordPress\ (220).odt
./Documents/7\ Best\ WordPress\ Help\ Desk\ Plugins\ for\ Customer\ Support\ (219).odt .
./Documents/A\ Linux\ User\ using\ Windows\ (Windows\ 10)\ after\ more\ than\ 8\ years(229).odt ./Documents/Add\ PayPal\ to\ WordPress(211).odt ./Documents/Atom\ Text\ Editor\ (202).odt ./Documents/Create\ Mailchimp\ account\ and\ Integrate\ it\ with\ WordPress(227).odt ./Documents/Export\ Feedburner\ feed\ and\ Import\ it\ to\ Mailchimp\ &\ setup\ RSS\ Feed\ Newsletter\ in\ Mailchimp(228).odt ----------------------------------DUPlicate files
 Job 7, “/usr/share/fslint/fslint/fslint” has stopped 
Important: Two things you should be kept in mind at this point. First fslint don’t delete any file on its own, It just shows you the lint files, their location and their name. You have to decide what to do with them. Second is fslint by default start searching from your ‘/home’ directory.

To search a different other than your /home directory, you must pass the directory name with the command, as:
$ /usr/share/fslint/fslint/fslint /home/avi/Pictures


To search recursively to all the sub-folders, you should use flag ‘-r’, simply as:
$ /usr/share/fslint/fslint/fslint -r /home/avi/Music/


fslint GUI Usage


You may fire the GUI Application built on top of fslint by typing fslint from Linux terminal or from theApplication Menu.
$ fslint-gui

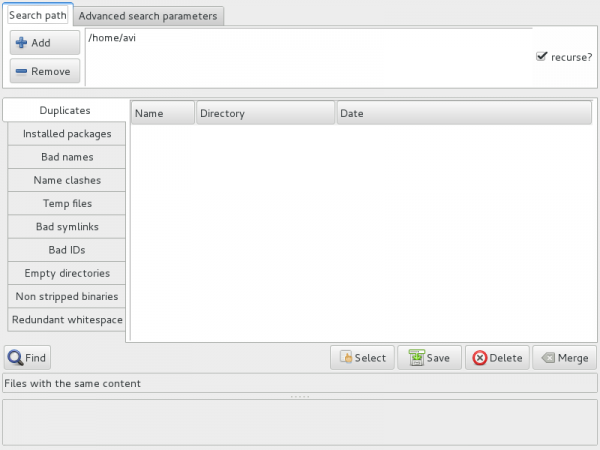
Everything in GUI is simple to understand. All you need to do is:
  • Add/remove the directories to scan.
  • Select to scan recursively or not by checking/unchecking checkbox on the top-right.
  • Click on ‘Find’. And all done!
Again you should remember, this utility do not delete the lint files but provide you with the information only and leaves everything on you.

Conclusion


fslint is a perfect tool that remove lint of various types from a file system. Though it needs improvement in certain gray areas: –
  • A bit slow for duplicate photo detection.
  • Requires some improvement in User Interface.
  • No Progress meter.
Hope you liked the post. If yes! Be audible. Post your valuable feedback in the comments below. Stay tuned and connected to Tecmint while I am working on another post you will love to read. Like and share us and help us get spread.

Saturday, August 15, 2015

Reset the root password on CentOS 7 and RHEL 7


I am going to show you how to reset the root password on CentOS 7 but this procedure is exactly the same on RHEL 7. This process was trivial in RHEL 6 systems but since RHEL 7 the process is now more complex. This guide assumes that you have been locked out of the root account and you are trying to regain access.


Steps Involved to reset the root password on CentOS 7 and RHEL 7:


Step 1. Boot to the Grub Menu.


Once at the boot menu you will have the latest kernel highlighted at the top for the first boot option. Press the E key to edit the boot options.


After you have pressed E you will want to look for the line that starts with linux16. You will likely have to scroll down close to the bottom of the page to see it.


Step 2. Boot OS into minimal environment


You will need to type init=/bin/bash at the end of the line as shown in the picture below. Afterward press Ctrl +X to boot with the added parameters.


Step 3. Remount root partition as read/write and change password


At this point you have booted into the minimal environment but the / root file system is in read only mode. Before you can change the password you must remount the root partition with read/write access.
mount -o remount rw /


After the file system has been remounted the passwd command is used to reset the root password on CentOS 7.

Step 4. Relabel root partition for SELinux


SELinux uses file labels for the context in which the files will be used. If SELinux is enabled and running, it will not allow access to files which are unlabeled. By changing root’s password we have created a file which is unlabeled and the password would not work on the next boot if nothing else is done. This step can be skipped if SELinux is disabled, but SELinux is on by default. To fix this we have to tell SELinux to relabel all the files on the file system. The command to do this is touch /.autorelabel. On the boot process if SELinux see’s that this file exists, then it will automatically relabeled before booting into the OS. This file is automatically removed after the relabel process so it will not continue to relabel on each boot.


Step 5. Reboot


The final step is to reboot but being in this minimal environment commands like reboot do not work. The command exec /sbin/init 6 will reboot the system. You might consider it the long way to write init 6.

After you have sent the init 6 command (reboot) you will see what looks like a normal boot procedure but at the bottom you will see a percentage counter. This is the SELinux relabeling process. You want to verify that you are seeing that if SELinux is enabled.


That completes the reset the root password on CentOS 7 and RHEL 7 procedure. The last command in Step 5 is to reboot and you would then be back at the login dialog to login with the password you just changed. Please leave a comment if you found this guide to be helpful.


Finding files on the Linux file system


In this guide I am going to show you how to find files on the file system. Linux has several great utilities for finding files and I will highlight them here. I am going to show you the find, locate, and grep commands along with examples and at the end I am sure will be able to find anything on your file system.

Using the find command


The find command works using various tests to define what exactly you are searching for. You could think of the tests as criteria definitions the command uses. A full list of all the tests can be found by looking at the man page for find. I have copied some of the tests and definitions out of the man page and have examples of their usage. There are many more test then what I have shown in examples.

-name pattern
Base of file name (the path with the leading directories removed) matches shell pattern.
find / -name file1
You could also use wild cards in the search
find / -name "file1.*"
find / -name "*.txt"
-amin n

File was last accessed n minutes ago.
find / -amin 10
-mmin n
File’s data was last modified n minutes ago.
find / -mmin 10
-group gname
File belongs to group gname (numeric group ID allowed).
find / -group apache
-ipath pattern
Like -path. but the match is case insensitive.
find / -ipath /var/log
 -size n[cwbkMG]
File uses n units of space. The following suffixes can be used:
`k’ for Kilobytes (units of 1024 bytes)
`M’ for Megabytes (units of 1048576 bytes)
`G’ for Gigabytes (units of 1073741824 bytes)
find / -size 5M
-type c
File is of type c:
c character (unbuffered) special
d directory
f regular file
l symbolic link; this is never true if the -L option or the -follow option is in
effect, unless the symbolic link is broken.
find / -type d -name var
-user uname
File is owned by user uname (numeric user ID allowed).
find / -user root
The find command can also perform an action at the end of the finding. For example you could find files with a certain name and then delete them. Another example would be to archive all the file with the tar command. These actions are performed with the -exec switch. You can pretty much add any commands at the end of find to perform additional actions.

This added at the end of find will perform rm -f on anything that has file1 at the beginning of its name.
-exec rm -f {} \; 
find / -name file1* -exec rm -f {} \;
This added at the end of find will perform tar -czvf /root/archive.tgz on anything that has file1 at the beginning of its name.
-exec tar -czvf /root/archive.tgz {} \;
find / -name file1* -exec tar -czvf /root/archive.tgz {} \;

Using the locate command


The locate command works differently then find. Find will search the file system starting at the point defined in the command. The command find / -user root would search the whole root file system looking for files owned by root. This could take some time depending on the number of files a system has. The locate command does not search the file system but instead searches a database of all the files on the file system. This database gets updated daily with new files on the system and searching for files usually takes less then one second. The drawback to this is the database likely will not have what you are looking for if it is a brand new file. The database can be manually updated at any time but this causes the locate command the index the entire file system.

To use the locate command you will need to have the mlocate package installed.
yum install mlocate

To manually update the locate database you would use the updatedb command
updatedb

To find a file you would just specify it name after the locate command
locate file-name

Using the grep command


The grep command works differently then find and locate in that it will search for text. This command can be used to search for text within a file, or whole directory, or even text output after a command is run. I will show examples of all three of these uses.
-n Show line number
-r Recursive

Searching the contents of a directory for a text string

grep -n pattern file-name
grep root /etc/passwd

Searching the contents of a directory for a text string


grep -rn directory -e "pattern" 
grep -rn /boot -e "root"


Searching the output of a command


To show how this examples works, I will need to use piping. The pipe in Linux is this character | and it is used to chain multiple together. Once executed it will run the command up to the first pipe and then pass the commands output to the next pipe. Piping can be a whole topic all into itself and is out of scope to this guide. If you just understand that a pipe combines multiple commands into one then you will be fine.


I started off with just the ps aux command and it dumped a list of every running process. I then wanted to know how many processes were running so I added a pipe and then used the wc -l command (counts the number of lines). My result was 429 processes. I then wanted to know how many of those processes are the httpd service so I added another pipe and another wc -l command. The end result was 10 of the running processes were the httpd service. If you look at the last line in the image, process 6078 is the grep search itself.


Wednesday, August 12, 2015

How to remote desktop from Windows to Red Hat Linux


In this guide I am showing you how to remote desktop from Windows to connect to a Red Hat Linux server. This is accomplished by installing a RDP (Remote Desktop Protocol) Server on a RHEL 7 based server. RDP is the protocol used by Microsoft Windows in the Remote Desktop program. With this RDP server installed you can open a remote connection to Linux from Windows. Microsoft also released the RDP client for Mac OSX so you can likely find it in the app store for Mac users.

Environment details: RHEL 7 server with xRDP installed and one Windows client to test with. RHEL server will have a static ip address of 192.168.1.250/24.

SELinux: Enabled
Firewalld: Enabled

Step 1. – Install Gnome graphical interface


If you started with a minimal installation then you will need to install the Gnome graphical environment

CentOS 7
yum groupinstall "GNOME Desktop" "Graphical Administration Tools"

RHEL 7
yum groupinstall "Server with GUI" "GNOME Desktop"


Also it is important to remember that the graphical environment has to running before you could use it. Configure the system to start the graphical environment at boot time and then start it up manually.

systemctl set-default graphical.target
systemctl default


Note* You will not see the graphical environment in the SSH session

Step 2. – Install xRDP repository

rpm -Uvh http://li.nux.ro/download/nux/dextop/el7/x86_64/nux-dextop-release-0-1.el7.nux.noarch.rpm

Step 3. – Install service

yum install xrdp tigervnc-server

Step 4. – Configure security

Configure SELinux for xRDP

chcon --type=bin_t /usr/sbin/xrdp
chcon --type=bin_t /usr/sbin/xrdp-sesman

systemctl start xrdp
systemctl enable xrdp

Configure firewall

To allow any ip to connect over RDP you would use this firewall command

firewall-cmd --permanent --add-port=3389/tcp
firewall-cmd --reload

To a specific network to connect over RDP you would use this firewall command

firewall-cmd --permanent --add-rich-rule='rule family="ipv4" source address="192.168.1.0/24" port port="3389" protocol="tcp" accept'
firewall-cmd --reload

Step 5. – Test from Windows


This it for the installation and configuration. The below video tests the connection from Windows to the RHEL 7 server.


If you get any connection errors check /var/log/messages. I noticed a connection problem and found this.


Jun 26 20:50:01 kvm python: SELinux is preventing /usr/libexec/colord from search access on the directory 13551.

***** Plugin catchall (100. confidence) suggests **************************

If you believe that colord should be allowed search access on the 13551 directory by default.
Then you should report this as a bug.
You can generate a local policy module to allow this access.
Do allow this access for now by executing:
# grep colord /var/log/audit/audit.log | audit2allow -M mypol
# semodule -i mypol.pp

As it notes just run the below commands to fix the problem.

grep colord /var/log/audit/audit.log | audit2allow -M mypol
semodule -i mypol.pp

Sunday, May 17, 2015

How to Manage Systemd Services on a Linux System


Systemd is now used by default in most Linux distributions, from Fedora and Red Hat to Ubuntu, Debian, openSUSE, and Arch. The systemctl command allows you to get information about systemd’s status and control running services.

Despite the controversy, this at least introduces some standardization across Linux distributions. The same commands will allow you to manage services in the same way on any Linux distribution using systemd.

Note: To modify your system configuration on Linux distribution like Ubuntu that uses sudo, you’ll need to prefix the commands here with sudo. On other Linux distributions, you’ll need to become the root user with the su command first.

Check If Your Linux System Is Using Systemd


If you’re not sure whether your Linux distribution is using systemd, open a Terminal window and run the following command. This shows you the version number of systemd on your Linux system, if it does have systemd installed:

systemd –version


Analyze the Boot Process


The systemd-analyze command allows you to view information about your boot process, such as how long it took and which services (and other processes) added the most time to the boot process.

To view information about the startup process in general, run this command:
systemd-analyze
To view how long each process took to start, run this command:

systemd-analyze blame


View Units

Systemd uses “units,” which can be services (.service), mount points (.mount), devices (.device), or sockets (.socket). The same systemctl command manages all these types of units.

To view all available unit files on your system:

systemctl list-unit-files

To list all running units:

systemctl list-units

To list all failed units:

systemctl –failed

Manage Services


To view a list of enabled and disabled services, you use the same systemctl command as above, but tell it to only list services:

systemctl list-unit-files –type=service

The systemctl command allows you to start, stop, or restart a service. You can also tell a service to “reload” its configuration.

The status command is the only action here that will print and output to the terminal. The other commands will silently take effect.
systemctl start name.service
systemctl stop name.service
systemctl restart name.service
systemctl reload name.service
systemctl status name.service

Use the systemctl enable command to have systemd automatically start a service (or other type of unit) at bootup. The systemctl disable command disables a services and stops it from starting automatically with your computer.

systemctl enable name.service
systemctl disable name.service

You can “mask” a service or other unit to prevent it from starting up at all. You’ll need to unmask it before it can start in the future:
systemctl mask name.service
systemctl unmask name.service

There’s a lot more to systemd and its various commands than this, of course. Systemd offers a variety or power-management commands to shut down, reboot, hibernate, and otherwise control the system’s power state. You can write your own unit files to create services and mount points or edit the existing unit files.

Systemd also offers “targets,” which are similar to runlevels, but different. instead of a number, targets have names — it’s possible for systemd to be in multiple target states at once. Systemd also offers its own system journal, which can be accessed with the journalctl command. By default, it stores system logs in binary format — but you can switch to plain-text format logs, if you prefer.

The Arch Linux wiki has more in-depth information on systemd, and most of the information there applies to systemd on all Linux distributions. You should also check your your own Linux distribution’s systemd documentation for more information.


Monday, April 27, 2015

Why You Don’t Need an Antivirus On Linux (and When You Do)


Believe it or not, there are antivirus programs targeted at desktop Linux users. If you have just switched to Linux and started looking for an antivirus solution, don’t bother – you do not need an antivirus program on Linux.

There are some situations when running an antivirus on Linux makes sense, but the average Linux desktop isn’t one of them. You would only want an antivirus program to scan for Windows malware.

Few Linux Viruses Exist in the Wild

The core reason you don’t need an antivirus on Linux is that very little Linux malware exists in the wild. Malware for Windows is extremely common. Shady advertisements push nasty software that is practically malware, file-sharing sites are full of infected programs, and malicious individuals target security vulnerabilities to install Windows malware without your permission. With this in mind, using an antivirus program on Windows is an important layer of protection.

However, you are very unlikely to stumble on – and be infected by – a Linux virus in the same way you would be infected by a piece of malware on Windows.

Whatever the reason, Linux malware isn’t all over the Internet like Windows malware is. Using an antivirus is completely unnecessary for desktop Linux users.


Why Linux is Safer Than Windows

Here are a few reasons why Windows struggles with a malware problem, while few pieces of malware target Linux:
  • Package Managers and Software Repositories: When you want to install a new program on your Windows desktop, you head to Google and search for the program. When you want to install most programs on Linux, you open your package manager and download it from your Linux distribution’s software repositories. These repositories contain trusted software that has been vetted by your Linux distribution – users aren’t in the habit of downloading and running arbitrary software.
  • Other Security Features: Microsoft has been doing a lot of work to fix serious security problems with Windows. Until UAC was introduced with Windows Vista, Windows users almost always used the Administrator account all the time. Linux users normally used limited user accounts and became the root user only when necessary. Linux also has other security features, like AppArmor and SELinux.
  • Market Share and Demographics: Linux has historically had low market share. It has also been the domain of geeks that tend to be more computer-literate. Compared to Windows, it’s not nearly as big or easy a target.


Staying Secure on Linux

While you don’t need an antivirus, you do need to follow some basic security practices, no matter which operating system you use:
  • Keep Your Software Updated: In an age when browsers and their plug-ins – particularly Java and Flash – are the top targets, staying up-to-date with the latest security patches is important. The biggest malware problem on Mac OS X was caused by the Java plug-in. With a cross-platform piece of software like Java, the same vulnerability can work on Windows, Mac, and Linux. On Linux, you can update all your software with a single, integrated updater.
  • Beware Phishing: Phishing – the practice of creating websites that pretend to be other websites – is just as dangerous on Linux or Chrome OS as it is on Windows. If you visit a website that pretends to be your bank’s website and enter your banking information, you are in trouble. Luckily, browsers like Firefox and Chrome on Linux have the same anti-phishing filter they do on Windows. You don’t need an Internet security suite to protect against phishing. (However, bear in mind that the phishing filter doesn’t catch everything.)
  • Don’t Run Commands You Don’t Trust: The Linux command prompt is powerful. Before you copy-paste a command you read somewhere into the terminal, ask yourself whether you trust the source. It could be one of the 8 Deadly Commands You Should Never Run on Linux.


When You Need an Antivirus on Linux

Antivirus software isn’t entirely useless on Linux. If you are running a Linux-based file server or mail server, you will probably want to use antivirus software. If you don’t, infected Windows computers may upload infected files to your Linux machine, allowing it to infect other Windows systems.

The antivirus software will scan for Windows malware and delete it. It isn’t protecting your Linux system – it’s protecting the Windows computers from themselves.

You can also use a Linux live CD to scan a Windows system for malware.

How to Use rsync to Backup Your Data on Linux


rsync is a protocol built for Unix-like systems that provides unbelievable versatility for backing up and synchronizing data. It can be used locally to back up files to different directories or can be configured to sync across the Internet to other hosts.

It can be used on Windows systems but is only available through various ports (such as Cygwin), so in this how-to we will be talking about setting it up on Linux. First, we need to install/update the rsync client. On Red Hat distributions, the command is “yum install rsync” and on Debian it is “sudo apt-get install rsync.”


The command on Red Hat/CentOS, after logging in as root (note that some recent distributions of Red Hat support the sudo method).


The command on Debian/Ubuntu.

Using rsync for local backups

In the first part of this tutorial, we will back up the files from Directory1 to Directory2. Both of these directories are on the same hard drive, but this would work exactly the same if the directories existed on two different drives. There are several different ways we can approach this, depending on what kind of backups you want to configure. For most purposes, the following line of code will suffice:

$ rsync -av --delete /Directory1/ /Directory2/
The code above will synchronize the contents of Directory1 to Directory2, and leave no differences between the two. If rsync finds that Directory2 has a file that Directory1 does not, it will delete it. If rsync finds a file that has been changed, created, or deleted in Directory1, it will reflect those same changes to Directory2.

There are a lot of different switches that you can use for rsync to personalize it to your specific needs. Here is what the aforementioned code tells rsync to do with the backups:

  1. -a = recursive (recurse into directories), links (copy symlinks as symlinks), perms (preserve permissions), times (preserve modification times), group (preserve group), owner (preserve owner), preserve device files, and preserve special files.
  2. -v = verbose. The reason I think verbose is important is so you can see exactly what rsync is backing up. Think about this: What if your hard drive is going bad, and starts deleting files without your knowledge, then you run your rsync script and it pushes those changes to your backups, thereby deleting all instances of a file that you did not want to get rid of?
  3. –delete = This tells rsync to delete any files that are in Directory2 that aren’t in Directory1. If you choose to use this option, I recommend also using the verbose options, for reasons mentioned above.
Using the script above, here’s the output generated by using rsync to backup Directory1 to Directory2. Note that without the verbose switch, you wouldn’t receive such detailed information.


The screenshot above tells us that File1.txt and File2.jpg were detected as either being new or otherwise changed from the copies existent in Directory2, and so they were backed up. Noob tip: Notice the trailing slashes at the end of the directories in my rsync command – those are necessary, be sure to remember them.

We will go over a few more handy switches towards the end of this tutorial, but just remember that to see a full listing you can type “man rsync” and view a complete list of switches to use.

That about covers it as far as local backups are concerned. As you can tell, rsync is very easy to use. It gets slightly more complex when using it to sync data with an external host over the Internet, but we will show you a simple, fast, and secure way to do that.

Using rsync for external backups


rsync can be configured in several different ways for external backups, but we will go over the most practical (also the easiest and most secure) method of tunneling rsync through SSH. Most servers and even many clients already have SSH, and it can be used for your rsync backups. We will show you the process to get one Linux machine to backup to another on a local network. The process would be the exact same if one host were out on the internet somewhere, just note that port 22 (or whatever port you have SSH configured on), would need to be forwarded on any network equipment on the server’s side of things.

On the server (the computer that will be receiving the backups), make sure SSH and rsync are installed.

# yum -y install ssh rsync
# sudo apt-get install ssh rsync
Other than installing SSH and rsync on the server, all that really needs to be done is to setup the repositories on the server where you would like the files backed up, and make sure that SSH is locked down. Make sure the user you plan on using has a complex password, and it may also be a good idea to switch the port that SSH listens on (default is 22).

We will run the same command that we did for using rsync on a local computer, but include the necessary additions for tunneling rsync through SSH to a server on my local network. For user “geek” connecting to “192.168.235.137” and using the same switches as above (-av –delete) we will run the following:
$ rsync -av –delete -e ssh /Directory1/ geek@192.168.235.137:/Directory2/
If you have SSH listening on some port other than 22, you would need to specify the port number, such as in this example where I use port 12345:

$ rsync -av –delete -e 'ssh -p 12345' /Directory1/ geek@192.168.235.137:/Directory2/


As you can see from the screenshot above, the output given when backing up across the network is pretty much the same as when backing up locally, the only thing that changes is the command you use. Notice also that it prompted for a password. This is to authenticate with SSH. You can set up RSA keys to skip this process, which will also simplify automating rsync.

Automating rsync backups

Cron can be used on Linux to automate the execution of commands, such as rsync. Using Cron, we can have our Linux system run nightly backups, or however often you would like them to run.

To edit the cron table file for the user you are logged in as, run:

$ crontab -e

You will need to be familiar with vi in order to edit this file. Type “I” for insert, and then begin editing the cron table file.

Cron uses the following syntax: minute of the hour, hour of the day, day of the month, month of the year, day of the week, command.

It can be a little confusing at first, so let me give you an example. The following command will run the rsync command every night at 10 PM:

0 22 * * * rsync -av --delete /Directory1/ /Directory2/

The first “0” specifies the minute of the hour, and “22” specifies 10 PM. Since we want this command to run daily, we will leave the rest of the fields with asterisks and then paste the rsync command.

After you are done configuring Cron, press escape, and then type “:wq” (without the quotes) and press enter. This will save your changes in vi.

Cron can get a lot more in-depth than this, but to go on about it would be beyond the scope of this tutorial. Most people will just want a simple weekly or daily backup, and what we have shown you can easily accomplish that. For more info about Cron, please see the man pages.

Other useful features

Another useful thing you can do is put your backups into a zip file. You will need to specify where you would like the zip file to be placed, and then rsync that directory to your backup directory. For example:

$ zip /ZippedFiles/archive.zip /Directory1/ && rsync -av --delete /ZippedFiles/ /Directory2/


The command above takes the files from Directory1, puts them in /ZippedFiles/archive.zip and then rsyncs that directory to Directory2. Initially, you may think this method would prove inefficient for large backups, considering the zip file will change every time the slightest alteration is made to a file. However, rsync only transfers the changed data, so if your zip file is 10 GB, and then you add a text file to Directory1, rsync will know that is all you added (even though it’s in a zip) and transfer only the few kilobytes of changed data.

There are a couple of different ways you can encrypt your rsync backups. The easiest method is to install encryption on the hard drive itself (the one that your files are being backed up to). Another way is to encrypt your files before sending them to a remote server (or other hard drive, whatever you happen to be backing up to). We’ll cover these methods in later articles.

Whatever options and features you choose, rsync proves to be one of the most efficient and versatile backup tools to date, and even a simple rsync script can save you from losing your data.

Tuesday, April 14, 2015

How to Install KVM and Create Virtual Machines on Ubuntu


If you’re using Linux, you don’t need VirtualBox or VMware to create virtual machines. You can use KVM – the kernel-based virtual machine – to run both Windows and Linux in virtual machines.

You can use KVM directly or with other command-line tools, but the graphical Virtual Machine Manager (Virt-Manager) application will feel most familiar to people that have used other virtual machine programs.

Installing KVM

KVM only works if your CPU has hardware virtualization support – either Intel VT-x or AMD-V. To determine whether your CPU includes these features, run the following command:

egrep -c ‘(svm|vmx)’ /proc/cpuinfo

A 0 indicates that your CPU doesn’t support hardware virtualization, while a 1 or more indicates that it does. You may still have to enable hardware virtualization support in your computer’s BIOS, even if this command returns a 1 or more.


Use the following command to install KVM and supporting packages. Virt-Manager is a graphical application for managing your virtual machines — you can use the kvm command directly, but libvirt and Virt-Manager simplify the process.
sudo apt-get install qemu-kvm libvirt-bin bridge-utils virt-manager
Only the root user and users in the libvirtd group have permission to use KVM virtual machines. Run the following command to add your user account to the libvirtd group:

sudo adduser name libvirtd


After running this command, log out and log back in. Run this command after logging back in and you should see an empty list of virtual machines. This indicates that everything is working correctly.

virsh -c qemu:///system list


Creating Virtual Machines


Once you’ve got KVM installed, the easiest way to use it is with the Virtual Machine Manager application. You’ll find it in your Dash.


Click the Create New Virtual Machine button on the toolbar and the Virtual Machine Manager will walk you through selecting an installation method, configuring your virtual machine’s virtual hardware, and installing your guest operating system of choice.


The process will by familiar if you’ve ever used VirtualBox, VMware, or another virtual machine application. You can install from a disc, ISO image, or even a network location.


To assign more than 2GB of memory to a virtual machine, you’ll need a 64-bit Linux kernel. Systems running 32-bit kernels can assign a maximum of 2 GB of RAM to a virtual machine.


By default, KVM gives you NAT-like bridged networking – your virtual machine won’t appear on the network as its own device, but it will have network access through the host operating system. If you’re running server software in your virtual machine and want it accessible from other devices on the network, you’ll have to tweak the networking settings.


After selecting your installation method, Virt-Manager will boot the guest operating system in a window. Install the guest operating system as you would on a physical machine.


Managing Virtual Machines


The Virtual Machine Manager window displays a list of your installed virtual machines. Right-click virtual machines in the window to perform actions, including starting, shutting down, cloning, or migrating them.


You can view information about the virtual machine and configure its virtual hardware by clicking the i-shaped toolbar icon in the virtual machine’s window.