Create an image of your USB drive and you can copy that image to another USB drive — or the same one — later. This is useful for duplicating USB drives or backing up a drive’s contents before overwriting it. For example, you could copy a live Linux USB drive or a Windows To Go USB drive and you’d get a full copy of the contents of the drive, including any personal data you saved to the live operating system.
This should also work with SD cards — even bootable ones. Raspberry Pi owners and anyone else who uses bootable SD cards
can get a lot of use out of this tool.
Why You Can’t Just Copy The Files
If you just have personal files and documents on the drive, you don’t need this tool. You can copy the files from your USB drive to a folder on your computer and copy them back whenever you want to restore them to your USB drive.
If your drive is bootable or has multiple partitions, just copying the files won’t cut it. The tool we’ll cover here will perform an exact copy of the contents of the drive, including its master boot record (MBR), slack space, and any unused space. This allows you to perform exact copies of a USB drive, even if it has multiple partitions and a master boot record. The resulting image can be copied to another USB flash drive, so you can easily duplicate a drive or create an exact image of a bootable drive for use later.

What You’ll Need
We recommend ImageUSB for this. It’s a free, lightweight utility that runs on Windows.
You should also ensure that you’re restoring the image of your USB drive to a drive with a similar size. The byte-for-byte copying process will make an exact copy, which means some of the space may be inaccessible if you move an image from a smaller drive to a larger drive. For example, let’s say you have a 4 GB USB flash drive and you create an image of it. You then write that image to a 12 GB flash drive — only 4 GB of that 12 GB flash drive will be accessible. The reverse is also problematic — create an image of a 12 GB drive and you won’t be able to copy it to a 4 GB drive later, even if there was less than 4 GB of data on the 12 GB drive.
You can always recover the space by reformatting and partitioning the drive later, of course.
Create An Image Of A USB Drive
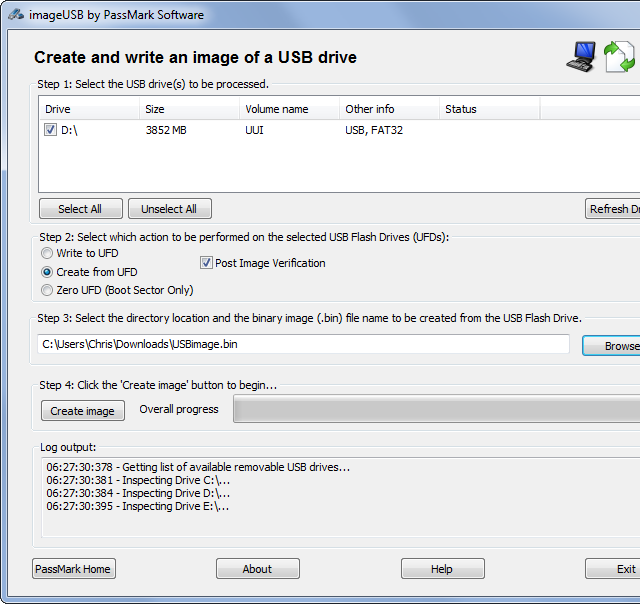
Insert your USB drive (or SD card) into your computer, open ImageUSB, and select the drive you want to create an image of. Select the Create from UFD option to create an image from a USB flash drive. Select a location for the resulting file — the file will have the .bin file extension as it’s a binary file representing the contents of the drive. Click Create Image and ImageUSB will create an image from the USB drive.
If you leave the Post Image Verification check box enabled — that’s the default — ImageUSB will scan your image or flash drive after the process completes to ensure the image copied correctly.
You can back up this image file or do whatever else you like with it. You’ll need ImageUSB to write the image to a USB flash drive in the future.
Write an Image To One Or More Flash Drives
ImageUSB can copy a USB flash drive image from a .bin file to one or more USB drives at once, which allows you to quickly duplicate a drive — you’re only limited by the number of USB ports in your computer.
Insert the drive into the computer, open ImageUSB, and select the drives you want to write to. Select the Write to UDF option to write an image to a USD flash drive. Browse to a .bin file created with ImageUSB and click Write to UFD to write the contents of the image to the USB flash drives you selected. Note that ImageUSB can only use .bin files created with ImageUSB.
Warning: This process will erase the contents of the USB drives entirely, overwriting them with the data from the image file.

This tool is fairly simple — the key is knowing you need to use it instead of just copying the files from the drive! If you want to back up or copy an entire flash drive, especially a bootable one, you’ll need a specialized tool like ImageUSB.
Source: makeuseof
No comments:
Post a Comment