
Get Linux to boot, on your Mac, from a USB stick or external hard drive. A simple program called Mac Linux USB helps make a formerly complex process simple, and is a godsend for those without optical drives.
So you want want to boot Linux, from a flash drive, on your Mac? If you’re reading this, you probably already know it’s harder than it should be. Old standbys like uNetBootin – while available for your Mac – do not create USB keys your Mac can actually boot. And you’ve probably noticed Ubuntu’s official, complex directions for the task. Maybe you’ve even tried them out, like me, and cursed when the resulting drive – which took hours to make – wouldn’t actually boot.
Don’t worry. There’s a simpler way – a GUI made specifically to get distributions like Ubuntu to boot on your Mac. It’s called Mac Linux USB, and it makes the process not only do-able, but easy.
All processes below were tested on a 2011 Macbook Pro – one that refused to boot any and all USB disks created by uNetBootin and similar tools. All you need for this process if your Mac and a blank USB stick – no Windows computer is required! The process primarily works with Ubuntu and derivatives, but could potentially work with other versions of Linux. Note that Macs cannot boot from the SD card reader – you’re going to need a USB stick or an external drive.
Step 1: Check And Format Your Drive
Note: this step might not be necessary for everyone, but for me made the process foolproof. Consider it recommended.
To get started, ensure your USB stick is properly formatted – we need a FAT32, MBR drive. In OS X, open up the Disk Utility – you’ll find it in your Applications folder, under Utilities, or by using Spotlight. In the left pane you’ll see your current drives. Click your USB stick, then clickInfo.

From here you should see the partition scheme, which should say “Master Boot Record” as seen above. If this isn’t the case, don’t worry: you can easily format the drive the way we want it. Click the drive, then click Partition. Click the drop-down menu that says Current then click 1 Partition.

Be sure to pick FAT as your filesystem, then click the Options button at bottom-left. Pick Master Boot Record:

Proceeding from here will wipe your drive, so if you’ve backed up everything on it go ahead and apply the changes. You’re now ready for the second step.
Step 2: Putting Linux On Your USB Stick
Now that your disk is ready, let’s go ahead and set up Linux on it. You can do this manually, if you like, but let’s start by using a program called Mac Linux USB – it removes some of the busy work from the process. Go ahead and download Mac Linux USB – you’ll want to grab the semi-recent build linked to toward the bottom of that page (1.0 as of this writing).
This software is capable of downloading Mac-compatible ISOs of Ubuntu, Linux Mint and Zorin OS:
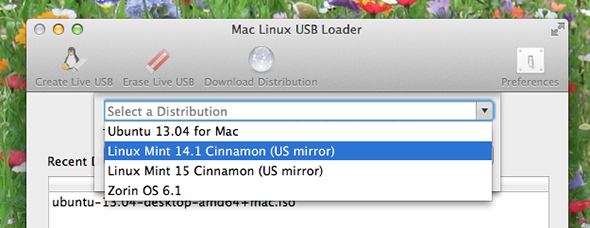
Feel free to use this tool to download your preferred version of Linux, though note that the options are limited – and ISO files you find elsewhere may or may not work. (If you prefer downloading Ubuntu with Bittorrent, be sure to grab the file with “+Mac” at the end of the file name – other versions will not boot on your Mac).
Once you’ve got your Linux distro of choice, click “Create Live USB” and direct the program to your ISO. Then the software will get to work:

How long this takes depends on the size of the ISO and the speed of your drive, but it shouldn’t take more than a few minutes on most modern Macs. When it’s done you’ll see there are only two new folders and three new files on your drive. You can replace the ISO later manually if you want to switch Linux distros (more on that later) and the other file is an EFI application – firmware that allows your Mac to boot the ISO.
Step 3: Booting Your Disk
Now for the easy part: booting Ubuntu from your drive. Assuming you did everything correctly – including grabbing a Mac-bootable Linux distro – this should be easy. Just shut down your Mac, then turn it back on. When you hear the Mac “Chime”, press and hold the “Option/Alt” key. You’ll be shown all the bootable drives on your Mac, including your USB stick (which will be yellow):

Use the mouse or keyboard to select your USB stick and you should – if all went well – see a black screen that says the following:

Eventually you will see the logo of your Linux distro, followed by the desktop itself. You’re in!

Congratulate yourself – you got Linux to boot from USB on your Mac, and that means you’re awesome.
Want to actually install Linux on your Mac? That’s another can of worms entirely – and probably one I’ll touch on in a future article. For now feel free to check out the Mac dual boot guide at help.ubuntu.com for in-depth instructions.
Optional: Manually Switching Distros
When you explored your USB stick with the finder, you probably noticed only three two files were added by Mac Linux USB: “boot.iso” and a boot loader ending with 32 or 64 (depending on whether you were attempting to boot a 32 or 64 bit operating system).

If you want to switch distros don’t feel like you need to use the GUI tool to do so – you can simply rename your new ISO to “boot.iso” and replace it. I did so to switch my drive from Ubuntu to Linux Mint without issue, but note that there’s no reason to assume every ISO under the sun will work – it seems to primarily work with Ubuntu derivatives.
If you want to get even more hands on, check out this amazing guide, from Studyblast.com. It includes a link to the EFI files used to cause the ISOs to boot, allowing you to create your own disk without the need for software like Mac Linux USB loader. Feel free to use this if you find the process simpler without software.
SevenBits, the developer of Mac Linux USB Loader, is quite actively developing the software – and will likely keep it working with future versions of Ubuntu, and possibly other versions of Linux. That’s why it’s my recommended method. Up to you, though – whatever works best.
Conclusion
Finding this process took me a while – I manually created quite a few drives only to find they didn’t work. I’m very thankful I eventually found Mac Linux USB Loader, because it removes a lot of the guesswork from the process. Hopefully every Mac user wanting to boot Linux from USB will find this software.
Of course, if you’re stuck, you can also ask for help in the comments below. I’ll do what I can to point you in the correct direction, but I might not be able to help – it really feels like Apple made life needlessly complex for us would-be Linux users.
What do you think? Is this process harder than it needs to be? Did you get it working some other way? Let us know in the comments below.
No comments:
Post a Comment